Showing posts with label how to. Show all posts

Thursday, July 28, 2011

Download The BaconTunaMelt Android App!

Hello cute ladies and gents (you're all cute in my eyes)! How are you all on this fine July morning? Everyone doing okay? In Lyon, it's been an unusually chilly summer month with a few thunderstorms here and there. The new blog is still under development after almost a month (I'll get to it eventually!).
BaconTunaMelt on Android
Anyhoots, what I came here to talk about is the newest development for loyal readers (-3 people). BaconTunaMelt is now available for Android users! Yup, there exists a BaconTunaMelt Android app. Cleverly named BaconTunaMelt on Android (what? I couldn't think of a good name for it), the app shows you the latest updates on the blog. 
Touch the star to add a post to favorites!
Besides the post updates, you can also tag a post as a favorite (and keep the article for future reading) and also share a post on Facebook, Plurk, Twitter, Google+, Reddit, and slew of other sharing sites.
Change settings to your personal preference. :)
You also have options for display, updates, notifications, backup, etc. In the meantime, it's not available on the official Android Market (I found out I needed to pay them $25 bucks for it, so no go) but you can still download it here and install it on your Android phones or tablets.

Here's how:
qrcode
BaconTunaMelt on Android APK
1. Scan this QR code with your basic Barcode scanner and it will direct you to download the BaconTunaMelt APK (you can also click the link if you're viewing this howto on your mobile or if you want to download it on your computer).
Open browser -> Save


2. Save the file and install (if you don't have an installer, download one like Easy Installer, it's free!).
Install -> Open
And last but not the least,
3. Add a shortcut of the BaconTunaMelt on Android app to your home screen and start getting nomz updates on your phone!
Look for the BaconTunaMelt logo! :)
*If you're having problems with the installation, tell us and we'll walk you through it. :P

Tuesday, January 25, 2011

How To Make Yema Balls: Possibly the Simplest Recipe Ever

If you follow this blog, you'd know that I tried to make fluffy yema balls last week. Unfortunately, it ended up in something close to a disaster (click this to read last week's post on how NOT to make yema). What was supposed to be soft, round, yellow, and fluffy balls of yema lightly coated in sugar ended up as a hard, brownish, uneatable slab of sugar.

Minor setback, I thought. So for the weekend, armed with a new recipe and renewed vigor, I gave it another shot. And the end result looked like this-
Yummy yema balls!
Following the recipe from The Pilgrim's Pot's and Pans (with a few tweaks), I had me some fantastically fluffy yema balls when I was done. (WARNING: The following text will contain much gloating at the success of my second atttempt in the kitchen.)
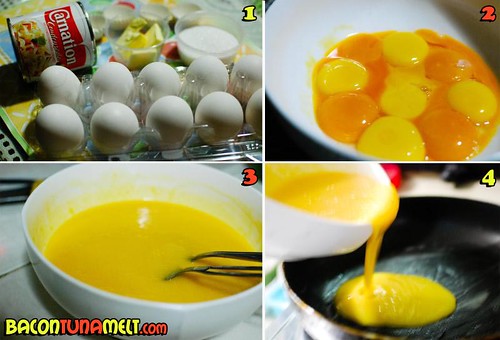
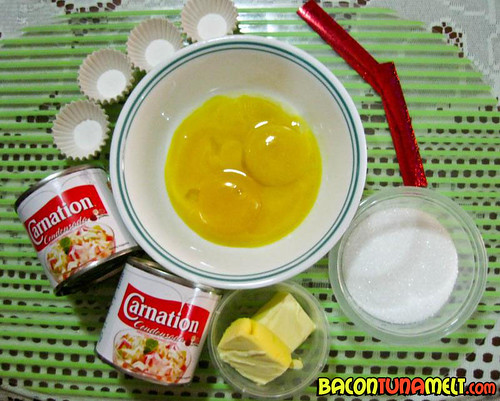
Step1: Prepare the ingredients. A 300ml can of condensed milk, 10 eggs, butter, sugar, and cupcake cups.
Step2:Separate the egg yolks (set aside the egg whites) and put them in a medium-sized bowl.
Step3:Beat the egg yolks, pour the condensed milk, and mix well. Notice the beautiful golden yellow color of the mixture?
Step4:Set the heat on low (as low as you can), lightly coat the non-stick pan with butter, and pour the mixture in.

And then comes the stirring-
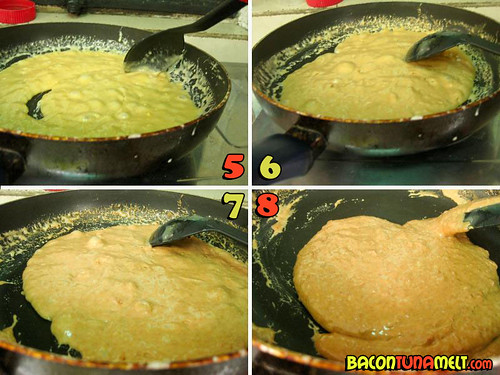
Step6: Initially, your mixture should be slightly thick, with a consistency not unlike syrup. Stir your mixture some more.
Step7:After about 10 minutes of stirring, your mixture should be noticeably thicker. Make sure your heat is set to low, so your mixture maintains its happy yellow color. Keep stirring.
Step8:After 15 minutes of stirring, most of the water should have evaporated and your mixture is about as thick as your typical congee.
Step9:After 20 minutes of stirring, your mixture should be thick and dry enough, similar to the texture of cookie dough.

And now the fun part-
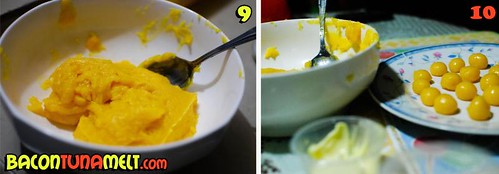
Step9: Transfer the dry mixture into a bowl and wait for it to cool. After about 10 minutes, you can start rolling them into balls.
Step10:Lightly coat your hands with butter and scoop out a small amount and roll it into a ball. Dip in white sugar and place it on the cupcake paper. Repeat until you use up all the batter and serve.

You now have soft and rich yellow yema balls. I deviated from the recipe I found online and did not add lime to the mixture because I thought that might give it a weird tangy taste. I also opted not to coat it in caramelized sugar because I did not want the rich taste of the milk and egg mixture overpowered by caramel, which tends to be too sweet.

This version of yema balls is sweet but not too sweet either. You can eat as many servings as you want and it won't leave a bitter taste in your mouth. The plain white sugar coating gives each bite of the soft ball a nice crunch. They're soft but they hold together well and are not messy to eat. You know you've made yummy yema when everyone who tried it loved it and requested for a second batch. 

I'm not so useless in the kitchen after all, yay! (Thanks Comicology dude, for being a cute kitchen elf. ^*^)

Monday, January 17, 2011

How Not to Make Yema

For those who know me,  you would know that the extent of my cooking abilities is limited to making instant noodles and frying hotdogs and eggs. I am almost useless in the kitchen and have never willingly stayed longer than I have to (only as long as I need to reheat old nomz in the microwave)

Inspired by the wonderful dishes from Carnation's Good Eats! Bloggers' Night, I attempted to actually use our kitchen (and not start a fire). I wasn't going to be overly ambitious the first time so thought to start with something small and simple. Scouring the net for the easiest thing to make that involved sweets and milk, I found a short recipe from the post Yema Balls - A Simple Filipino Treat on the blog A Cupcake or Two.
4 egg yolks, 3 tablespoons of butter, 2 small cans of condensed milk, sugar (for coating) and small cupcake cups
It sounded easy enough to make, with too few ingredients for a noob to mess up. Come Friday night, I passed by the grocery to get eggs, Carnation condensed milk, sugar, butter, and cupcake paper for BaconTunaMelt's version of yema balls.

Up bright and early on a Saturday (also a first), I had my ingredients prepared, utensils ready and the recipe printed out by 9am. There was a bit of a snafu right when I started because I didn't know how to separate the egg yolk from the egg whites. That should have been my indicator that although the recipe is simple, a kitchen noob will remain a kitchen noob without any actual practice.

Here's how NOT to make yema:
Step 1- Melt butter in a non stick pan over low heat;
Step 2- As soon as the butter is melted, pour in the can of condensed milk and stir for half a minute;
Step 3- Pour in the egg yolks;
Step 4- Keep the heat on low and stir. Your mixture should be a light yellow color and slightly thick;
Step 5- You'd notice your mixture getting thicker, keep stirring over low heat;
Step 6- The mixture would be bubbling a little because of the heat, but keep stirring;
Step 7- After about 15 minutes, your mixture should be getting darker and you'd still be stirring;
Step 8- Your stirring arm should be feeling really numb now, but keep stirring.

Now if you weren't such a noob, you'd figure out that the mixture is thick enough and you should stop the heat to let it cool down and when it's cool enough, you start rolling them into balls and then coating them with sugar. But for noobs like me, we keep going.
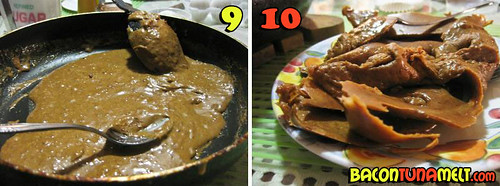
Step 9- Stir until your arm feels like it's about to fall off and until the mixture looks like brown paste;
Step 10- The mixture is cool, but is also rock hard. Take it out of the pan if you can and end up with this solid mass of brown.

You now have a yema that's not really yema, but a hard candy that kinna tastes like toasted pastillas. Or peanut brittle without the peanut. If you're really nice, we can call it candied yema. And that, ladies and gentlemen, is how NOT to make yema.

*this isn't going to dishearten me from wanting to make yema, I'll try again soon enough. Tune in next week to find out what I'll end up with then.

UPDATE: My next attempt at making yema was successful! Check out the fantastic results here- How To Make Yema Balls: Possibly the Simplest Recipe Ever! ^_~

Thursday, September 16, 2010

How To Eat a Balut Egg

To truly experience the Filipino culture, you can't just visit and enjoy the sights and sounds of the Philippines, you must also try Pinoy food and delicacies. One of the more unusual delicacies of our lovely country is the balut. Simply put, a balut is a boiled fertilized duck egg. In detail, balut is a fertilized duck egg with a nearly-developed duck embryo boiled and eaten directly from the shell. Sounds fun?
They look normal don't they? Balut eggs (p12/pc)
Usually, balut vendors walk around the streets of Manila at a scheduled time of the night, call out "Baluuuuuuuuuuuuuuuut!" in a deep voice and you can just head over to where the sound comes from. There was no call after dinner that night; luckily, we found a vendor that stays put at the corner of the street.

This is Dave. He's from Canada and he recently came here for a visit. He is looking apprehensively at the seemingly normal egg in front of him. Of course, we just had to let him try balut. How? Here's a step by step guide for balut newbs-
Related Posts with Thumbnails